


In the past month, AMP articles have been added to Google Search results and Apple News has opened its doors to all publishers. And in April, the Facebook Instant Articles program will begin accepting applications from interested publishers.
Content publishing is a tough game. Publishers have to be at the leading edge of change as the web evolves to avoid losing viewership to more nimble competitors while simultaneously publishing the best content possible. As a publisher, if you take your eye off of either prize there’ll be bounce-rate-hell to pay.
WordPress is the most popular content publishing platform on the web, and the WordPress community has proven itself wonderfully adept at accommodating the constant evolutionary demands that are thrown at it. But before you start integrating the latest mobile optimization plugins into your WordPress website, you need to know which new formats to embrace and which ones you’re better off skipping.
Facebook Instant Articles (FBIA), Accelerated Mobile Pages (AMP), and Apple News (no acronym necessary) are similar in concept but used in very different ways. All three make static content such as blog posts and news articles load more quickly on mobile devices and provide a more immersive and app-like experience. However, each platform is implemented quite differently:
In this article, we’ll explore all three publishing platforms so you can decide which formats make the most sense for your content and audience.

Facebook OpenGraph allows any website to control the appearance of its content when shared on Facebook and several other social networks. WordPress plugins like Yoast SEO and Ultimate Facebook have made it easy to add OpenGraph markup to a WordPress website.
Facebook Instant Articles take things several steps further than OpenGraph. Rather than just controlling how content appears when shared on Facebook, FBIA actually creates a mobile-optimized copy of the article and partially preloads it in the background when it appears in a users newsfeed. As a result, FBIA content loads up to ten times faster than standard content in the Facebook mobile app. Facebook users prefer content that loads quickly and are expected to interact with and share FBIA content more frequently.
As we recently discovered, joining the program and integrating a WordPress website with FBIA is not for the faint of heart, and there are few issues publishers should consider before applying to join the program:
While Facebook is allowing any content publisher to apply to the program as of April 12, 2016, websites that publish content on a regular basis, such as news organizations and very active blogs, are who the program is designed for. If your website publishes content regularly and relies on Facebook sharing for a significant portion of your traffic, joining the program really isn’t optional, it’s mandatory.
You can learn more about this program by reading the official program documentation and by learning how to get your WordPress website ready for Instant Articles.

If you have an iPhone or iPad and noticed the News app show up and replace the old Newsstand app after an iOS update back in September 2015, then you’re already familiar with Apple News. When the program launched, it was initially only open to 20 publishers. However, as of March 2016, the platform has been opened up to all publishers.
There are a few different ways to get content onto the Apple News platform. You can create new content using Apple News Publisher, use a WordPress plugin, or submit your website’s RSS feed.
Submitting the URL for your website’s RSS feed is the most straightforward way to connect your website to the platform, but the Publish To Apple News WordPress plugin provides many additional configuration options. While the plugin is a bit rough right now due to its relative infancy, this plugin, and others that are sure to follow, will provide a greater degree of control over how content looks when it is pushed to Apple News.
WP Tavern recently published an article about their efforts to get onboard Apple News. Based on the WordPress news site’s experience, of the three platforms covered in this post, Apple News looks to be the most straightforward to join and configure.
Clear statistics of how many users actually use Apple News are hard to come by (even for Apple!). So it’s hard to say definitively who should consider signing up for the program.
Interested publishers should consider that some of the biggest names in publishing are already on Apple News. The New York Times, CNN, HuffPost, the Atlantic, NPR, Buzzfeed, Vox, and virtually every other major news publisher seems to have embraced the platform. A search for “WordPress” reveals that several publishers in our corner of the world are already active on the platform as well.

AMP is an open source project that formats static web pages in such a way that they load very quickly on mobile devices. AMP article format has been embraced by more than 200 content publishers, including WordPress.com, and is already being used on several different popular platforms such as Google search, LinkedIn, Medium, Nuzzel, Pinterest, and Twitter.
Without a doubt, AMP articles load much faster than standard mobile web pages. Pinterest’s Engineering Blog has published research confirming that this is true, and personal hands-on experience validates those claims.
There are a couple of plugins already in the official WordPress Plugin Directory which can be used to generate AMP format articles automatically.
Once you have your WordPress website set up to generate AMP articles you’ll want to validate your AMP pages. Pages that don’t pass validation won’t be recognized and indexed by some platforms, including Google and Twitter. Anecdotal evidence suggests that getting AMP pages to validate is easier said than done, as some plugin authors and webmasters are finding out.
In time, most publishers will want to configure their websites to generate AMP articles. AMP format is already highly relevant to publishers who’s stories make into into the Top Stories portion of Google’s search results, and to anyone who relies on Twitter, LinkedIn, and Pinterest sharing and traffic.
AMP is open source, and additional platforms are sure to add support for AMP articles over time. It seems probable that AMP format will become the de facto standard for static content viewed on mobile devices. While major players like Apple and Facebook may stick with their own formats, the broader mobile development community is likely to adopt open source AMP format.
If your organization publishes a lot of content, is active on Facebook, and relies heavily on traffic from the social network, there’s really no way to get around joining Facebook Instant Articles. Over time, Facebook users will learn to recognize FBIA content and will prefer it over non-FBIA content. Long-term success as a content publisher on Facebook will demand that you embrace the FBIA format.
Apple News is an interesting platform and may represent a good opportunity for early adopters who can get a corner on the Apple News audience. However, if you’re going to pick one platform not to join, make it Apple News.
In time, every publisher will want have to add support for AMP articles to their website. It’s already embraced by several important platforms, and with Google adding the technology to their various products, it’s only a matter of time before AMP formatting becomes synonymous with publishing content for mobile devices.
What do you think? Which, if any, of these platforms do you plan on integrating into your WordPress website? Let us know in the comments below.
In this blog series, we talk to WP Engine employees to learn more about their roles, what they love about the city they work in, and hear from them what they like most about working at WP Engine.
What is your position here at WP Engine?
I am a Market Development Agent. The team I work on is called called the MDR team, MDR standing for Market Development Representative, which is part of the sales team here at WP Engine.
How did you first learn about WP Engine?
I had seen them at SXSW a few years ago and they seemed like pretty cool people. At the time I had just left an agency that built sites in WordPress but I didn’t have much sales experience. After many odd jobs, and a year and a half selling phones at AT&T I saw WP Engine was hiring for sales, so I thought I’d apply.
Can you describe a typical day in your role?
It’s mostly making phone calls, sending emails, and researching businesses who are a good fit for managed hosting. But month-to-month our focus changes which is pretty refreshing. This role was brand new in October and my duties included taking leads generated from the marketing team and calling them up to see if we can learn a bit about their business. The other side of it is prospecting, which is what I focus on now — trying to find brand new companies who could benefit from managed hosting.
Did you have any odd jobs prior to WP Engine?
I did door to door sales years ago in NY in the winter, selling Verizon FiOS. I unloaded trucks at Target a few years back. In college I delivered wings until around 4 a.m. on Fridays and Saturdays.
What are some of your favorite things about working at WP Engine?
It’s the people. Everyone’s got an entrepreneurial mentality, everyone’s really focused, and more than happy to help you grow. I didn’t like sales before this, but when I started here it was easy to get into it since more often than not, the biggest selling point for me is the people who work at this company.
What have you gained from working here?
I’ve definitely overcome the fear of rejection. When you’re picking up the phone and calling people to try and start a business conversation, it’s not much different from knocking on a door. But there’s a lot of cases where people appreciate it because we take the time to research their company and they like that we reached out to give them options.
What are some of your hobbies outside of work?
Acting and writing. I am signed with a talent agency in town and occasionally audition for commercials and TV shows. I’m also taking acting classes right now and in 2014, I self-published a novel on Amazon. Also, you can occasionally find me dragging people from WP Engine downstairs to do stand-up comedy at the Austin Ale House. FYI I’m not the only one here who’s done it.
What is one of your favorite things about Austin?
I like that there’s a lot of people who aren’t from here. You could be meeting people from Chicago or California or Alabama…everybody is really friendly and unique.
If you could paint this office any color you wanted to, what would it be?
Orange. Syracuse alum.
If you were reincarnated as an animal, what would it be?
A bald eagle.
What tv show/movie are you ashamed to admit you love?
Dog Soldiers – it’s a werewolf movie that’s completely ridiculous, but entertaining.
Where is your favorite place to eat in Austin?
Hut’s Hamburgers.
Can you tell a joke?
I don’t know. What’s the perfect Austin joke?
…
Let’s taco bout it over breakfast.
Any random facts you could share with us?
I won third place in a guitar shredding contest in college.
WP Engine is currently hiring for positions in sales. See here for the full range of careers WP Engine is hiring for: wpengine-careers.com
The post WP Engine Employee Spotlight: Will Ruff, MDR Sales appeared first on WP Engine.
Recently, one of our users asked how they can create an autoblog in WordPress. An autoblog is an automated WordPress site that pulls content from other sources and publishes them. In this article, we will show you how to create an autoblog in WordPress.
Autoblog or an automated blog is a website that automatically pulls content from other websites using RSS feeds.
Mainly the term is associated with content-scrapers and spam blogs. However, there are many perfectly good and profitable usage scenarios for autoblogging tools.
For example, an autoblog can be used to create a curated website that gathers news on specific topics and then presents them under one roof. An autoblog can also be used on company intranets and private websites.
Having said that, let’s take a look at how to create an autoblog in WordPress.
First thing you need to do is install and activate WP RSS Aggregator plugin. For more details, see our step by step guide on how to install a WordPress plugin.
The basic plugin is free, but for this tutorial you will need paid addons in the Advanced Feeds Bundle.
The pricing starts from $139 for a single site license with one year of support and updates.
Once you have installed and activated all the addons, simply visit RSS Aggregator » Add New to add a new feed source.
First you need to provide this feed source a title, and then provide the RSS feed URL.
Next you need to scroll down a little to the ‘Feed to Post’ section. Here you need to select a post type for imported feed items.
By default, the plugin will import posts as draft. If you want, then you can change that to published.
Don’t forget to check the box next to ‘Force full content’ option. Using this option, will allow WP RSS Aggregator to fetch full text of posts.
Next, you need to set up ‘Feed to post – images’ section. This is where you set up how your autoblog will handle images.
It can automatically import images from feed sources and store them in your WordPress media library. It can also fetch the first image in the content and use it as featured image. You need to set up these options to match your own needs.
The add new feed source page has many other options. You can review them and adjust them to meet your own needs.
You can use keyword filtering to import or exclude content matching certain keywords or tags. You can also add custom content before or after the source article.
Click on the Publish Feed button when you are done.
You can now visit your posts section, and you will see feed items imported into your WordPress site.
Repeat the process to add more feed sources if you need. You can check the status of your feeds by visiting RSS Aggregator » Feed Sources.
Adding each feed source, and configuring them one by one can be a tedious task. Here is how you can quickly add multiple feeds at once using the same settings.
Go to RSS Aggregator » Settings and click on Feed to Post tab. Here you can configure the default settings for the feed to post addon.
These settings will be applied to all the feed sources that you add in the next step.
Next, you need to visit RSS Aggregator » Import & Export. Under the import box, you need to add name and url of your feed sources.
Separate name and feed URL with a comma and a space. Add one feed source per line.
After that click on bulk import button to quickly add all the feed sources to your WordPress autoblog.
That’s all, we hope this article helped you create an Autoblog in WordPress.
If you’re creating an autoblog that’s public, please do not scrape full content or images because you will be subject to copyright infringement.
The best use of an autoblog is either when it’s used inside a company intranet. If you’re creating a curated news site, then pull in summaries and link to original source for full article.
If you liked this article, then please subscribe to our YouTube Channel for WordPress video tutorials. You can also find us on Twitter and Facebook.
The post How to Create an Autoblog in WordPress appeared first on WPBeginner.
Recently one of our users asked us how to move a GoDaddy Website Builder site to WordPress. GoDaddy offers a website builder tool that allows users to create websites using simple drag and drop tools. However, many users quickly realize the limitations of using a tool like Godaddy’s website builder and want to move their website to a flexible and powerful platform like WordPress. In this article, we will show you how to move GoDaddy website builder site to WordPress.
Editor’s Note: This article has a lot of manual steps which can be time consuming depending on the size of your website. We didn’t want to write this article at first, but due to repeat requests we have written this for those who’re looking to switch from Godaddy website builder to WordPress.
The success of your WordPress site depends on the WordPress hosting you choose. If you already have GoDaddy’s hosting service, then you can use that for your WordPress site.
If you want to move to a new host, then we recommend Bluehost. They are one of the largest hosting companies in the world, and they are an official WordPress hosting partner.
For WPBeginner users, they’re offering 50% off and a free domain name as well.
WordPress has import tools for many services and tools like Blogger, Tumblr, LiveJournal, etc. But it does not have an import tool for Website Builder.
This is why you will need to backup your Website Builder site manually. It can be a little consuming, depending on how much content you have on your website.
Backing up GoDaddy Website Builder Content
If you have just a few pages, then you can backup by simply saving images and copying text into text files on your computer.
You can also visit each page on your website in your browser, and then press CTRL+S (Command+S on Mac) on your keyboard.
This will bring up the save dialog box. Make sure that you select ‘Webpage, Complete’ in the ‘format’ or ‘save as type’ field.
Repeat the process for all pages on your website.
Make sure that you have downloaded all your images and text. Disconnect internet on your computer and then open the files you have downloaded to double-check.
Alternatively, you can use the free HTTrack tool to copy the website on your computer.
HTTrack is a website copier. You can simply enter the URL of your website, and it will make a copy of it on your computer.
The problem is that, GoDaddy website builder and its templates store their files on different CDN servers. The name and addresses of these servers vary from one site to another.
This makes it harder to download all your image files. However, if your website is mainly based on text and you don’t mind losing images, then Httrack is the fastest way to copy your website.
Once you disable website builder, you will not be able to get back to your website. Take your time to make sure that you have a backup of all your website data.
At this time, you’re probably wondering why isn’t there an easier way. Probably because Godaddy doesn’t want you to switch. That’s why choosing the right platform is an important decision, but we’re glad that you have made the right choice to go with WordPress.
Backing up Your Link Structure
You will need to redirect people visiting old URLs of your website to the new URLs in WordPress. To do that, you need to have a list of all URLs on your website.
If you have just a few pages, then you can simply copy and paste the URL of each page on your site in a plain text file.
Alternately, you can use online tools to extract URLs from your site. You can use Klipper, a Google Chrome extension to save URLs in a txt file.
Don’t worry if you miss out a page. We will also show you how to automatically set up alerts for 404 errors in WordPress and redirect users in WordPress.
This step is only for users who will be using GoDaddy’s hosting service to run their WordPress site. If you are using some other WordPress hosting provider like Bluehost, Siteground, Hostgator, etc, then skip this and jump to the next step.
Disable GoDaddy Website Builder
If you want to use GoDaddy’s hosting service for your WordPress website, then you cannot install WordPress on that domain until you deactivate Website Builder service.
Simply login to your GoDaddy account and click on your username on the toolbar at top. This will display a flydown menu where you need to click on ‘Manage Website Builder’.
This will show your Website Builder account. You need to click on the options button next to your domain name.
It will bring you to the Website Builder options page. Under the overview tab, you will find a link to cancel your account. Click on it to deactivate Website Builder on your domain name.
Your website builder account will now be deactivated, and your domain would become available to host your WordPress website. It will take nearly an hour before your Website Builder account is fully deactivated.
Adding Hosting to Your Domain
Now that your domain is free from GoDaddy website builder. You still need to add hosting service to that domain.
Click on web hosting under account manager and then click on manage button next to your account.
This will bring you to the cPanel dashboard of your hosting account. You need to scroll down to the domains section and then click on Add on domains.
Now you can enter your domain name. The subdomain and document root fields will be automatically filled.
You also need to check the box to create an FTP account. Simply select a username and password for your FTP account. Finally, click on the add domain button.
That’s all you have successfully freed up your domain from Website Builder and added web hosting for your domain.
You can now jump to Step 4, to learn how to install WordPress and continue moving your website.
This step is for users who have their domain registered with GoDaddy and want to use it with some other WordPress hosting provider like BlueHost or Siteground.
Log in to your GoDaddy account and click on your username on the toolbar at top. This will reveal a flydown menu where you need to click on manage my domains.
Select your domain from the list and click on the Nameservers button on the top and then select set nameservers.
This will bring up a popup where you need to click on custom and then click on the link to enter custom nameserver.
A new popup will appear with two fields. You can add your new WordPress hosts nameservers here. If your WordPress host has more than two nameservers, then you can click on the Add Nameserver button to add another line.
Click on the OK button and then click on the save button to store your settings. Remember that DNS changes may take upto 24 hours to propagate throughout the internet. Although it usually only takes a few hours.
Once your domain starts pointing to your new WordPress host, you can proceed to the next step.
By now your domain should be pointing to your hosting service and you are ready to install WordPress. Whether you are using GoDaddy or any other hosting service, the process is the same.
WordPress is famous for its 5-minute install. Most hosting companies offer 1-click installers for new WordPress websites, which allows you to install WordPress on your website with just a few clicks.
For more details, see our step by step WordPress installation tutorial for beginners.
As we mentioned earlier that you will have to manually backup your Website Builder content. It is not possible to automatically import content from Website Builder.
By default WordPress comes with two built-in content types called posts and pages. See our guide on the difference between posts and pages.
You need to create new pages or posts on your website and copy paste your GoDaddy website builder content.
Creating posts and pages in WordPress is really simple. See our detailed tutorial on how add a new post in WordPress and utilize all the features.
If you have the list of links from old website builder site, then you can go right ahead and setup redirects.
First thing you need to do is install and activate the Simple 301 Redirects plugin. For more details, see our step by step guide on how to install a WordPress plugin.
Upon activation, you need to visit Settings » 301 Redirects page. Enter your old URL under the ‘Request’ field and enter the new WordPress URL for that page in the ‘Destination’ field.
Click on save changes button to store this redirect. Repeat the process for all other URLs.
For more detailed instructions and other ways to setup redirects, take a look at our beginner’s guide to creating redirects in WordPress.
WordPress comes with thousands of beautiful themes both paid and free. Take a look at our guide on selecting the perfect theme for WordPress.
However, most powerful feature of WordPress is its extensibility, which comes from plugins. There are thousands of WordPress plugins that allow you to do almost anything imaginable.
Take a look at all the plugins we are using on this site in WPBeginner’s Blueprint or see our expert pick of must have WordPress plugins for business websites
We hope this article helped you move your GoDaddy Website Builder site to WordPress. You may also want to see our comparison of best drag and drop page builders for WordPress.
If you liked this article, then please subscribe to our YouTube Channel for WordPress video tutorials. You can also find us on Twitter and Facebook.
The post How to Move GoDaddy Website Builder Site to WordPress appeared first on WPBeginner.


Picking a theme is a bit like picking a car: It’s easy to get distracted by the beauty and power of a beautiful product and end up with a convertible two-seater when what you really need i9s a reliable sedan with comfortable seating for five.
I’ve found myself in that situation at least a few times. Trial-and-error has led me to develop an informal system for defining project requirements and evaluating and comparing candidate themes before making a commitment. In this article, I’ll describe the process I use for theme selection and how you can use it to increase your chances of selecting a theme that is a good fit for your next WordPress project.
Never pick a theme until you know exactly what you’re trying to build. Picking a theme is fun, but planning website content is the most important part of the website creation process and the part that requires the most self-discipline.
Content precedes design. Design in the absence of content is not design, it’s decoration.
— Jeffrey Zeldman (@zeldman) May 5, 2008
Content first, theme selection second.
For a website to be effective, content must come first. Define the purpose of the website, the overall structure, and the media and text resources that will be used to build the website before you even begin to start looking at themes.
Create a catalog of all of the pages the website will include and what will be included on each page. Be as detailed as possible. For example, if you’re creating a business website that will include a page highlighting key company staff members, your description for that page might look something like this:
Staff Page: Profiles for four executive staff members. Each profile will include a photo, a bio between 125 and 150 words long, and one or two social icons.
Use this information to identify the features you need out of a theme. Then as you shop for themes, refer back to this list to pinpoint themes that include built-in support for the features you plan to use.
The key in this step is to find themes that are built to do what you’re trying to do. Misapplying a theme is a recipe for frustration as you try to bend the theme to fit your vision – a vision it was never intended to fulfill.
Many of the most popular themes in the WordPress Theme Directory, such as Sydney , are very image heavy and are ideally suited to be used as portfolio websites for creative agencies. If you are building a blog you would be happier avoiding a theme like Sydney in favor of one designed with your type of project in mind, such as Twenty Sixteen.

Can you force a theme like Sydney to work as a blog? Sure. However, you’ll be up and running a lot quicker if you use themes to build the sorts of websites they were designed to build.
The project budget and timeframe will have a lot to say about how much time you can afford to spend on a website. There are three different categories of themes you can consider based on the demands of your project and the amount of time you can spend perfecting the finished product.
Theme frameworks are the way to go if you need to start with a blank slate. Genesis, Thesis, and our own Upfront theme framework are all solid products you can build any type of website on top of. With some practice, you’ll get pretty good at crafting sites quickly with your favorite framework. However, if speed is the most important factor, you may want to either skip the framework in favor of a theme or select a skin or child theme pre-built for your favorite framework.
At the other end of the spectrum are full-featured themes intended to be used with right out-of-the-box and require minimal modification. You can either select a stand-alone theme, such as the aforementioned Sydney theme, or a pre-built skin for your favorite framework such as one of our Upfront starter themes.
Lastly, if you don’t want to build a theme from scratch with a framework, and you can’t find a theme that’s perfect right out-of-the-box, you can select a theme or framework skin that is designed to be easily customized. It almost goes without saying that framework skins are designed to be easy to work with. However, the same is not true of themes. Some are easy to customize while others are very difficult to customize and may break easily. In the last part of this article, we’ll explore ways to determine how easy it will be to customize a theme in case you want to go this route.
When you put together a website you have specific pieces of content to work with. You will be integrating carefully selected images, graphics, videos, and text. Every piece of content that goes into the website will have a specific purpose.
When a theme designer puts a demo site together they don’t face the same constraints. Their goal is to make a site that is as visually appealing as possible and makes use of every available theme feature. They can use as much lorem ipsum and as many stock photographs as they want to make that happen.
When you look at a demo remember that you aren’t there to evaluate the content of the demo. You are there to evaluate how well that theme fits your needs.
While you should ignore the demo site content, you should pay careful attention to demo features.
Going back to our example about staff profiles, take a look at the demo for specific ways you can create profiles. Does the demo include features you can easily use for this purpose?
Zerif Lite is a theme from the WordPress Theme Directory that offers a feature targeting this need.

Some of the most important theme components to pay attention to include:
Once you’ve settled on a couple of themes that fit your content and offer the features you need, there are a few different tests you can use to compare the technical performance of the themes.
One option is to run the theme demo site through Pingdom’s Website Speed Test. Don’t worry too much about the load time or page size at this point unless you get results that are alarming. Website load time can vary dramatically based on the hosting setup and location, and the caching and minifying implemented on the demo site. The page size of demo sites is often quite bloated due to the use of very high-quality images and video backgrounds. The metrics to pay the most attention to are the number of HTTP requests made and the overall performance grade.
If you find that a theme or framework you really want to use doesn’t do very well when run through this test, consider it a heads-up that you need to pick a good caching and minifying plugin such as Hummingbird rather than a reason to reject the theme outright.
The best way to use the results of this test when evaluating themes is a basis for comparing candidate themes. For example, if you’ve settled on using either Zerif Lite or OnePress, based on the results of this test you might give OnePress a slight edge, although both of these themes actually test quite well.

Another tool you can use to evaluate themes is Google PageSpeed Insights. Once again, there isn’t a specific benchmark you’re looking for. Run all of the themes you’re considering through this test and compare the results. While you’re at it, use the test results to identify the performance issues you will need to address based on the theme you select.
The last thing you want to do is get a sense for what it’s like to work with the theme. Many themes offer an admin area preview. Take a few minutes to review this preview to understand what it will be like to work with this theme. If the theme or framework includes a visual drag-and-drop editor see if you can find a live preview of the editor and spend several minutes modifying the positioning and appearance of website elements.
If you’ll be writing custom CSS to modify the theme open the theme demo site and take a look at the CSS files using Developer Tools. The goal is to get a feeling for how easy or hard it will be to customize the website. Here are a few things I look for when evaluating theme CSS:
!important used? While virtually all themes can be expected to override standard CSS inheritance with this value at least a few times, if you plan to make manual edits and find that a theme uses this value a few hundred times, you can expect it to be difficult to manipulate manually.One way to get a sense for how easy it will be to edit a theme’s presentation by writing CSS rules manually is to pick an element you will want to modify and to use the Styles Pane in Developer Tools to live-edit the demo site and figure out how specific you’ll have to be to select the element and make the desired modifications. If you haven’t use Chrome Developer Tools before, check out our article on how to leverage it for WordPress development.
We’ve covered a lot of ground. To make things simple, here’s a checklist of the criteria discussed in this article:
After running through that list you should be ready to select the framework or theme that best fits your project.
How do you go about choosing themes for your WordPress projects? Are there any other steps you take? Let us know in the comments below.
Recently, one of our San Antonio support techs, Daniel, was hit by a car while riding his bike into work. His bike is his main source of transportation, and he couldn’t get around easily without it. Fortunately, he wasn’t hurt, but the accident left him with a gnarled and mangled bike that looked more like abstract art than a functional mode of transportation. Still, Daniel showed up to work, and apologized for being late.
Upon hearing the news, WP Engine rallied, as it’s done so many times in the past.
Within minutes, a colleague had spun up a contribution site to try and raise a little cash to help offset the cost of a new bike.
That’s when the WP Engine magic happened.
WP Engine employees pitched in. They pitched in a lot. And they did so quickly, so much so that we raised $500 for a new bike and a new helmet in less than two hours. It happened so fast that we had to ask folks to stop contributing.
No one was forced to do this. No executive put out a call to action. There were no “it-would-be-nice-if” conversations. This was a grassroots effort by employees to help out their coworker and friend. They recognized the need and took action. That’s the power of WP Engine. That’s who we are. That is what it means to work here.
Like a lot of startups and young companies, we talk a lot about our culture and our core values. A strong culture is a major differentiator and helps not only attract talent, but it also serves to retain the right kind of talent.
Over the last five years, we’ve managed to preserve our unique culture by hiring people who fit well within it, and by nature can help maintain and improve it. It’s not an exact science, but it works.
We can write our core values on a piece of paper, or on a poster. We can stick them to the wall. But they mean nothing if you don’t practice what you preach. And the act of practicing should be natural, not forced, and not a chore.
And when we see that culture in action, like with Daniel and his bike accident, that’s when it all really clicks.
For two years running Austin Business Journal has named us one of the best places to work in Central Texas, and actions like this are one of the key reasons why.
We’re a lot more than a company. We’re a community. We look out for each other.
That community affects our customers too. Because when someone feels like they’re part of something special, as most WP Engine employees do, it inspires them to volunteer their best every day. When people are engaged and give their job their all, our customers benefit in the form of a better platform and better support. It’s sort of contagious in that way. We thrive on serving our customers and giving them a glimpse of who we are and what we stand for. It’s a relationship that not all companies have with their customers.
Ultimately, it comes down to us having each other’s backs, and the backs of our customers, and it’s what inspires and influences how we conduct business every day.
It’s incredible to be a part of it; to see it from the inside. It’s both humbling and inspiring. It’s truly awesome, and truly unique. It’s truly WP Engine.
Want to be part of the WP Engine community? We’re hiring.
The post Getting Hit By A Car: The True Measure Of The WP Engine Community appeared first on WP Engine.
Occasionally, when building a WordPress website you might think that the built-in login page doesn’t exactly meet your needs. Sometimes, you might want the login form embedded into your site’s front-end. Other times, you might need functionality that isn’t available using the default /wp-login.php page.
We’ve previously looked at how to completely customize the WordPress login page, exploring ways of merging it into your site’s branding. In this post, we’ll look at how to extend some of the functionality offered in that post with more practical examples.
This post looks at front-end and backend login customization in two sections. In the first part, I will explain how to handle the login process from the site front-end. We’ll look at how to:
Note that we’ll explore just the login task, letting WordPress take care of redirection on failed login, password reset, user registration and data editing. All these tasks deserve careful attention and will provide us with more to dive into and explore in the future.
In the second part of this post, I will show you how to add greater functionality to the built-in login page. We’re going to:
We’ll also look at several examples to acquaint you with functions, actions and filters available for the handling of the login process. I’ll assume you’re familiar with the key concepts behind action and filter hooks. If you’re not, before going through this post take the time to have a read over A Quick (and in-Depth) Guide to WordPress Hooks.
Let’s start diving into login customization.

When designing the user flow for a new website, you might want to display a login form on the front-end of your site. You can achieve this goal thanks to the wp_login_form function, which echoes (or returns) a simple login form (check the WordPress Codex for details).
This function holds an array of parameters, whose values set the URL for redirection after login, IDs, labels and the default values of the form elements.
In the following example we’ll create a simple shortcode, which will enable site authors to embed the login form anywhere into the site:
In the code above we’ve set the value of echo to false so that the function won’t print the HTML of the form, but will return the mark-up as value of the $output variable. The same value will be returned by the callback function.
In case the user was already logged in, the function returns a message and the logout link (this latter returned by the wp_loginout function).
Now, let’s create a new post (or page) and include the [frontend-login-form] shortcode. As a result, we’ll get the login form shown in the image below.

We can include the form in a sidebar as well, but first we have to force WordPress to process shortcodes in text widgets. This task can be accomplished using the widget_text filter and the do_shortcode function as we’ve already done in the code above.

In the previous example, once logged in the user is redirected to the same page he/she is coming from, whatever their role. But we can redirect users to specific pages depending on their roles or capabilities.
For instance, we may want to prevent site subscribers from having access the admin area while redirecting to the dashboard all the users belonging to other roles. We can accomplish this usin the login_redirect filter hook.
Consider the following code:
It’s quite self explanatory: login_redirect filters the URL of the resource the user should be redirected to on successful login. In our example, if the user has the capability to edit_posts (all roles but subscribers), the user will be redirected to the dashboard. If the users hasn’t, they will be redirected to the site home page.
If we’ve created a new custom login page, we may also want to overwrite default login URL. To do that we can use the login_url filter, as shown in the following code:
Here, we’re calling the add_query_arg function, which we’ve appended the query arguments redirect_to and reauth to the URL. The same URL is finally returned by the callback function.
Now we have a new login URL and we can build the corresponding link programmatically from our scripts. In the next example, I’ll show you how to append the login and logout links to a primary menu.
In the main file of a plugin (or in the functions.php file of a child theme) copy and paste the following block of code:
The wp_nav_menu_items filter allows us to append new items to menus. By setting a specific theme location, our customization will affect just one custom menu. If the user is logged in, the callback function will automatically append the logout URL, otherwise it will append the login URL.
So far we’ve seen how to log in the user from the front-end. Nevertheless, chances are that we would prefer to keep the login on its own default page. So, in the following examples we’ll see how to take advantage of some of the many functions, actions and filters we can use to customize the page structure and add functionalities to the login form.
The header of the default WordPress login page is structured as follows:
It’s just a h1 element with an anchor pointing to WordPress.org. We can act on this structure thanks to three hooks, one action (login_head) and two filters (login_headerurl and login_headertitle). Take the following code as an example:
login_head action fires after scripts are enqueued, and we can hook to this action a function to enqueue custom scripts and styles. In our example, we’ve added a single declaration to change the background image of the anchor in the headerlogin_headerurl filters the link URL of the header logo. In our example, the callback function returns the home URLlogin_headertitle filters the title attributeThis is just a basic example, which aims to demonstrate how actions and filters come in handy to customize the login experience. If you need more control over the presentation of the login page, take a moment to read how to completely customize the WordPress login page. Then, if you want to add more functionality to the built-in login form, read over our last and more advanced example…
It’s time to give our users more control over the login process. In this last example, we’ll give them the ability to choose the URL of the page to be redirected to.
First, we’ll add a new field to the login form with the following function:
The login_form action fires following the ‘Password’ field in the login form and preceeding the ‘Remember me’ checkbox, so the callback function prints the select menu in that precise position.
With the form field in its place, we can put it in action with the following code:
Here, we’re checking whether a valid value for the select field has been sent. If so, the switch statement set a value for $redirect_to variable depending on the option selected by the user.

The user will be now redirected to the page of their choice.
The login process is an important part of a website’s user flow and we as web designers should take the time to consider the user experience. Whether we decide to allow users to log in from a site front-end or keep with the default backend log in form, we can customize all options in terms of both presentation and functionality.
WordPress provides up with the powers of customizzation – it’s up to use to make good use of them.
Have you got further ideas for login customization? Do you have any favorite examples of login forms that have been customized? Join the conversation and share them with us in the comments below.
Logo credit Giulio Baccari.
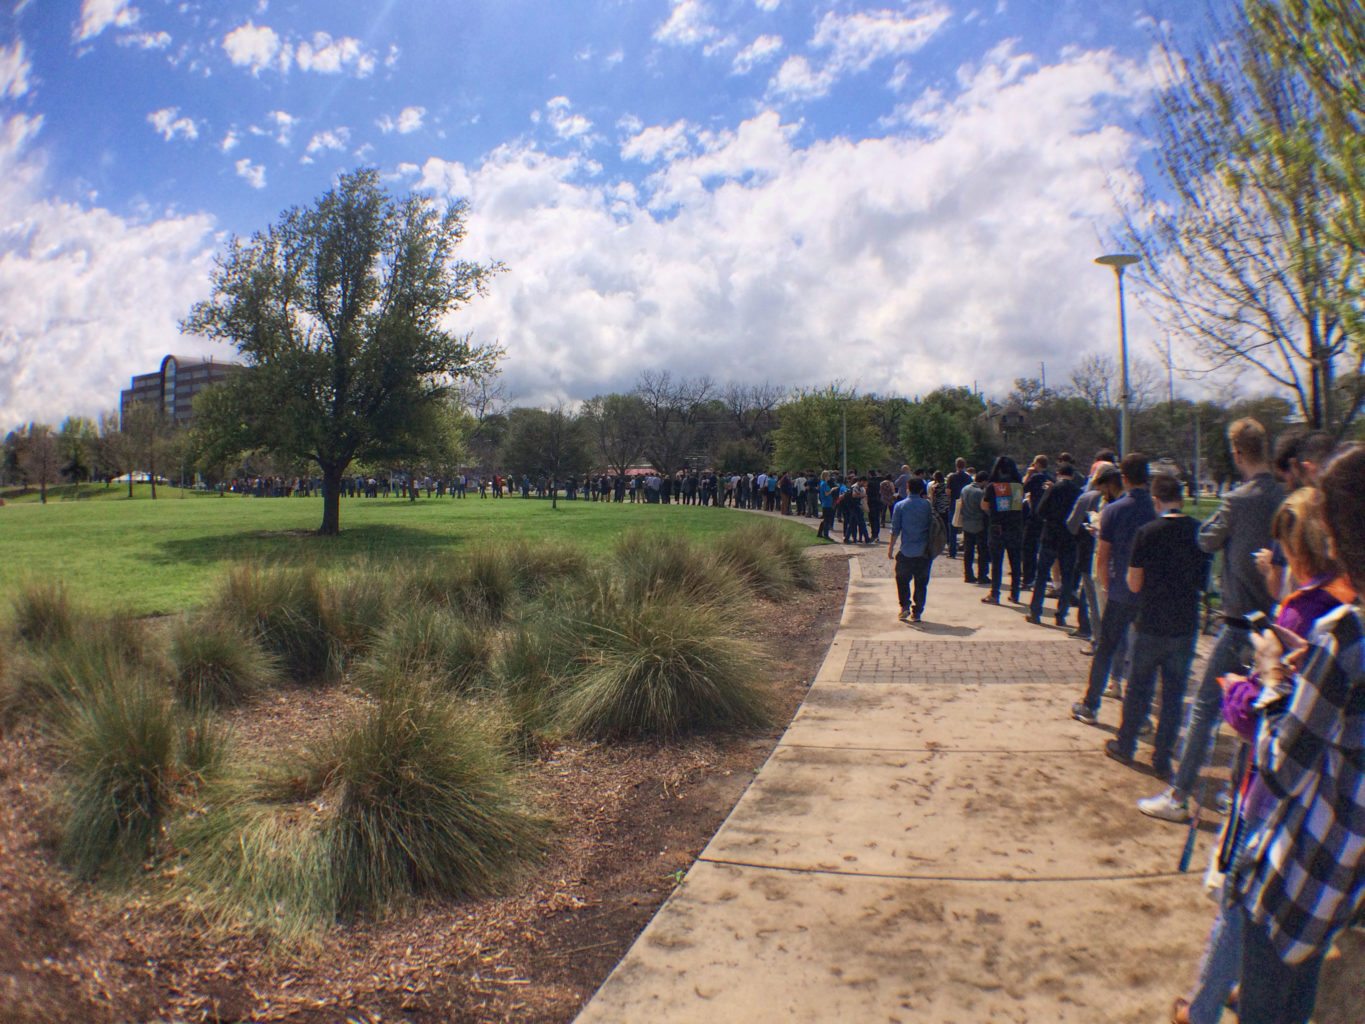
SXSW Interactive started off with a bang, as President Barack Obama visited Austin to participate in a SXSW Interactive keynote presentation at the Long Center for the Performing Arts. SXSW Interactive guests were invited to enter an online lottery to win a ticket to attend the president’s keynote presentation, which marked the first time a sitting president participated in SXSW.

Prior to the event, around 2,000 SXSW Interactive goers gathered outside the Palmer Events Center, forming a long line as they waited to be seated to hear the president’s speech.
The presentation began with Hugh Forrest, the Director of SXSW Interactive, who stepped on the stage with enthusiasm, referring to the president’s visit as “the most special event in 30 years at SXSW.”
Taking the form of an interview, Obama’s presentation touched on 21st century civic engagement and community service. Evan Smith, CEO, Founder and Editor-In-Chief of The Texas Tribune interviewed Obama. The president began his speech with love for Austin, claiming that he likes any excuse to visit the city.
Obama is known for choosing a new place to eat every time he comes to town. This time, the president chose Torchy’s Tacos for lunch. “I had The Democrat…but then I had The Republican…and then The Independent because I wanted to give all a proper hearing,” Obama jokingly said,, referring to the names of several popular tacos available at Torchy’s.
.@BarackObama's bill at Torchy's Tacos in Austin comes to $18.40. He calls Austin Mayor Steve Adler a "cheap date." pic.twitter.com/doWp2uMKKd
— Patrick Svitek (@PatrickSvitek) March 11, 2016
Obama then expressed his true reason for visiting SXSW: to recruit SXSW Interactive attendees to come up with new ideas across different platforms to solve various problems in technology, civic life, and in the White House. “We can start coming up with new platforms, new ideas across disciplines and across skill sets to solve some of the big problems we’re facing today,” he said.
For example, the president said, when the government determined that some of the software it used was outdated, the government brought in top talent from Google, Facebook, and other innovative companies to upgrade the outdated systems to more modern technology.
The president stressed the importance of harnessing technological skills to form digital purpose so millions can be helped. He said there are different ways for people to get engaged to make a difference.
One topic Obama touched on was how difficult it is to vote. “We make it hard to vote. It’s easier to order pizza, or book a vacation than it is to select who’s going to represent your government,” he said. He mentioned that we need to redesign our systems so there’s not a low rate of voter turnout. “We’re trying to engage folks for how we can create safe, secure systems for people to vote online, and to be more aware of who they’re voting for,” the president said.
Another topic President Obama addressed was the belief that the government doesn’t do any good, or that they haven’t proven to do any good, for its citizens. Obama rebutted the claim with the example of those who look on their phone to check the weather. “Well, the government has a geolite satellite system rotating over earth,” he said. He also brought up the fact that the government is what keeps others from invading our country.
Continuing his talk on technology, Obama said that he hopes we can one day extend the digital space to communities that might not be able to afford it. ConnectED is an initiative that aims to deliver high speed wireless Internet to 99 percent of classrooms by 2018.
“It’s not enough just to focus on the cool next thing. We’ve got to harness that technology so that everybody can use it,” he said.

The end of the interview touched on Apple and the FBI and privacy concerns, where Obama urged against “absolutist” views. The key, he said, is strong encryption and only accessing data from someone’s phone when the issue is important and there is probable cause.
Time ran out before the attendees could ask the president questions, but Obama jokingly interrupted Smith saying they could go one more minute because he is the president, afterall.
The post Tech And Tacos: President Obama Kicks Off SXSW 2016 appeared first on WP Engine.


