Whether you want your users to log in from the front-end or backend of your websites, WordPress allows you to fully customize the experience for both.
Occasionally, when building a WordPress website you might think that the built-in login page doesn’t exactly meet your needs. Sometimes, you might want the login form embedded into your site’s front-end. Other times, you might need functionality that isn’t available using the default /wp-login.php page.
We’ve previously looked at how to completely customize the WordPress login page, exploring ways of merging it into your site’s branding. In this post, we’ll look at how to extend some of the functionality offered in that post with more practical examples.
This post looks at front-end and backend login customization in two sections. In the first part, I will explain how to handle the login process from the site front-end. We’ll look at how to:
Include a login form into posts and widgets
Redirect the user on successful login
Set a custom login page
Conditionally display a login/logout link in a menu
Note that we’ll explore just the login task, letting WordPress take care of redirection on failed login, password reset, user registration and data editing. All these tasks deserve careful attention and will provide us with more to dive into and explore in the future.
In the second part of this post, I will show you how to add greater functionality to the built-in login page. We’re going to:
Customize the HTML structure of the login page header
Get the most from the built-in login page with additional form fields
We’ll also look at several examples to acquaint you with functions, actions and filters available for the handling of the login process. I’ll assume you’re familiar with the key concepts behind action and filter hooks. If you’re not, before going through this post take the time to have a read over A Quick (and in-Depth) Guide to WordPress Hooks.
Let’s start diving into login customization.
The WordPress backend login form.
Including a Login Form in Posts and Text Widgets
When designing the user flow for a new website, you might want to display a login form on the front-end of your site. You can achieve this goal thanks to the wp_login_form function, which echoes (or returns) a simple login form (check the WordPress Codex for details).
This function holds an array of parameters, whose values set the URL for redirection after login, IDs, labels and the default values of the form elements.
In the following example we’ll create a simple shortcode, which will enable site authors to embed the login form anywhere into the site:
In the code above we’ve set the value of echo to false so that the function won’t print the HTML of the form, but will return the mark-up as value of the $output variable. The same value will be returned by the callback function.
In case the user was already logged in, the function returns a message and the logout link (this latter returned by the wp_loginoutfunction).
Now, let’s create a new post (or page) and include the [frontend-login-form] shortcode. As a result, we’ll get the login form shown in the image below.
The image shows the login form embed into a regular post
We can include the form in a sidebar as well, but first we have to force WordPress to process shortcodes in text widgets. This task can be accomplished using the widget_text filter and the do_shortcode function as we’ve already done in the code above.
Once we’ve enabled shortcode processing in text widgets, the login form can be included into any sidebar
Redirecting the User on Login
In the previous example, once logged in the user is redirected to the same page he/she is coming from, whatever their role. But we can redirect users to specific pages depending on their roles or capabilities.
For instance, we may want to prevent site subscribers from having access the admin area while redirecting to the dashboard all the users belonging to other roles. We can accomplish this usin the login_redirectfilter hook.
Consider the following code:
It’s quite self explanatory: login_redirect filters the URL of the resource the user should be redirected to on successful login. In our example, if the user has the capability to edit_posts (all roles but subscribers), the user will be redirected to the dashboard. If the users hasn’t, they will be redirected to the site home page.
Setting a Custom Login Page
If we’ve created a new custom login page, we may also want to overwrite default login URL. To do that we can use the login_urlfilter, as shown in the following code:
Here, we’re calling the add_query_argfunction, which we’ve appended the query arguments redirect_to and reauth to the URL. The same URL is finally returned by the callback function.
Adding Login and Logout Menu Items Programmatically
Now we have a new login URL and we can build the corresponding link programmatically from our scripts. In the next example, I’ll show you how to append the login and logout links to a primary menu.
In the main file of a plugin (or in the functions.php file of a child theme) copy and paste the following block of code:
The wp_nav_menu_itemsfilter allows us to append new items to menus. By setting a specific theme location, our customization will affect just one custom menu. If the user is logged in, the callback function will automatically append the logout URL, otherwise it will append the login URL.
So far we’ve seen how to log in the user from the front-end. Nevertheless, chances are that we would prefer to keep the login on its own default page. So, in the following examples we’ll see how to take advantage of some of the many functions, actions and filters we can use to customize the page structure and add functionalities to the login form.
Customizing the Login Header
The header of the default WordPress login page is structured as follows:
It’s just a h1 element with an anchor pointing to WordPress.org. We can act on this structure thanks to three hooks, one action (login_head) and two filters (login_headerurl and login_headertitle). Take the following code as an example:
The login_head action fires after scripts are enqueued, and we can hook to this action a function to enqueue custom scripts and styles. In our example, we’ve added a single declaration to change the background image of the anchor in the header
login_headerurl filters the link URL of the header logo. In our example, the callback function returns the home URL
login_headertitle filters the title attribute
This is just a basic example, which aims to demonstrate how actions and filters come in handy to customize the login experience. If you need more control over the presentation of the login page, take a moment to read how to completely customize the WordPress login page. Then, if you want to add more functionality to the built-in login form, read over our last and more advanced example…
Let Your Users Select the Redirect URL
It’s time to give our users more control over the login process. In this last example, we’ll give them the ability to choose the URL of the page to be redirected to.
First, we’ll add a new field to the login form with the following function:
The login_form action fires following the ‘Password’ field in the login form and preceeding the ‘Remember me’ checkbox, so the callback function prints the select menu in that precise position.
With the form field in its place, we can put it in action with the following code:
Here, we’re checking whether a valid value for the select field has been sent. If so, the switch statement set a value for $redirect_to variable depending on the option selected by the user.
A customized login form
The user will be now redirected to the page of their choice.
Wrapping Up
The login process is an important part of a website’s user flow and we as web designers should take the time to consider the user experience. Whether we decide to allow users to log in from a site front-end or keep with the default backend log in form, we can customize all options in terms of both presentation and functionality.
WordPress provides up with the powers of customizzation – it’s up to use to make good use of them.
Have you got further ideas for login customization? Do you have any favorite examples of login forms that have been customized? Join the conversation and share them with us in the comments below.
SXSW Interactive started off with a bang, as President Barack Obama visited Austin to participate in a SXSW Interactive keynote presentation at the Long Center for the Performing Arts. SXSW Interactive guests were invited to enter an online lottery to win a ticket to attend the president’s keynote presentation, which marked the first time a sitting president participated in SXSW.
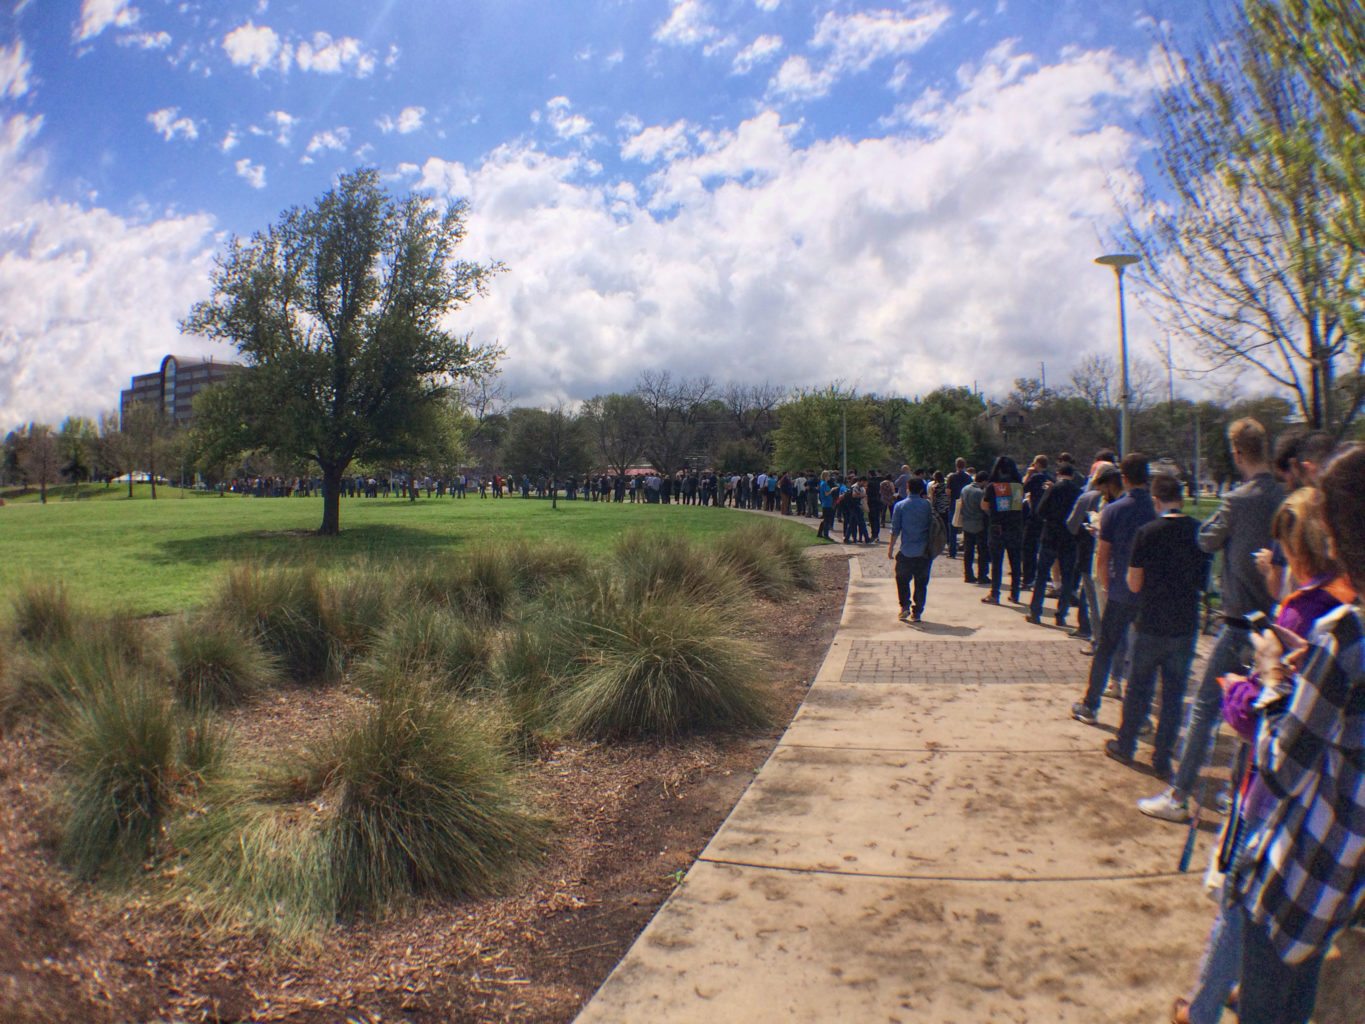
Prior to the event, around 2,000 SXSW Interactive goers gathered outside the Palmer Events Center, forming a long line as they waited to be seated to hear the president’s speech.
The presentation began with Hugh Forrest, the Director of SXSW Interactive, who stepped on the stage with enthusiasm, referring to the president’s visit as “the most special event in 30 years at SXSW.”
Taking the form of an interview, Obama’s presentation touched on 21st century civic engagement and community service. Evan Smith, CEO, Founder and Editor-In-Chief of The Texas Tribune interviewed Obama. The president began his speech with love for Austin, claiming that he likes any excuse to visit the city.
Obama is known for choosing a new place to eat every time he comes to town. This time, the president chose Torchy’s Tacos for lunch. “I had The Democrat…but then I had The Republican…and then The Independent because I wanted to give all a proper hearing,” Obama jokingly said,, referring to the names of several popular tacos available at Torchy’s.
Obama then expressed his true reason for visiting SXSW: to recruit SXSW Interactive attendees to come up with new ideas across different platforms to solve various problems in technology, civic life, and in the White House. “We can start coming up with new platforms, new ideas across disciplines and across skill sets to solve some of the big problems we’re facing today,” he said.
For example, the president said, when the government determined that some of the software it used was outdated, the government brought in top talent from Google, Facebook, and other innovative companies to upgrade the outdated systems to more modern technology.
The president stressed the importance of harnessing technological skills to form digital purpose so millions can be helped. He said there are different ways for people to get engaged to make a difference.
One topic Obama touched on was how difficult it is to vote. “We make it hard to vote. It’s easier to order pizza, or book a vacation than it is to select who’s going to represent your government,” he said. He mentioned that we need to redesign our systems so there’s not a low rate of voter turnout. “We’re trying to engage folks for how we can create safe, secure systems for people to vote online, and to be more aware of who they’re voting for,” the president said.
Another topic President Obama addressed was the belief that the government doesn’t do any good, or that they haven’t proven to do any good, for its citizens. Obama rebutted the claim with the example of those who look on their phone to check the weather. “Well, the government has a geolite satellite system rotating over earth,” he said. He also brought up the fact that the government is what keeps others from invading our country.
Continuing his talk on technology, Obama said that he hopes we can one day extend the digital space to communities that might not be able to afford it. ConnectED is an initiative that aims to deliver high speed wireless Internet to 99 percent of classrooms by 2018.
“It’s not enough just to focus on the cool next thing. We’ve got to harness that technology so that everybody can use it,” he said.
The end of the interview touched on Apple and the FBI and privacy concerns, where Obama urged against “absolutist” views. The key, he said, is strong encryption and only accessing data from someone’s phone when the issue is important and there is probable cause.
Time ran out before the attendees could ask the president questions, but Obama jokingly interrupted Smith saying they could go one more minute because he is the president, afterall.
A revamped collection of WordPress themes for hairdresser, mobile first portfolio, blogging, agency, business, real estate, kids, magazine, medical, and more types of websites in as many styles as you can imagine.
After installing an SSL certificate on your site to amp up your security, you may notice your images suddenly don’t display at all. Don’t panic – just read on for the fix.
When you install an SSL certificate, like the free one from Let’s Encrypt we wrote about recently, your site’s address adjusts slightly and even a slight adjustment means some elements on your site will probably break. Your site sees a conflict with the URL where it’s programmed to run and the old URL some content such as images are using. Everything has moved to your https URL, but your images still point to http.
This means you need to change all the image links and replace http with https. What a pain in the rear, right? Fortunately, you don’t have to track down and edit every single image you have uploaded. You can make the switch manually in your database or you can opt for the easier and safer route with a plugin.
If you have successfully updated your site with your new secure URL, but the images aren’t all functioning properly, read on to see how you can manually make the changes you need in your database or view the services and plugins you can use instead which are safer and quicker to use.
Manual Search and Replace with Queries
It’s possible to change your image links manually in your database, though, be forewarned: It can be easy to make a mistake and further break your site. While I’ll still show you how you can make these changes for completeness, it’s important to make note of the risks and it’s up to you to decide whether you should proceed.
I recommend you use a trusted plugin instead since there’s a bit less of a chance to make a mistake. Still, you should use the right amount of caution when making any changes to your site.
That being said, if you find yourself in a rare situation where you need to take a look at your database and tables to sniff out some broken image links, you can do this with a database search and replace query.
Log into phpMyAdmin and click on your site’s database that’s listed on the left, then click the Query tab. In the SQL query on database box toward the bottom of the page, enter the following query, the click Go:
Be sure to update www.your-site.com to reflect your real domain name and change the wp table prefix of wp_posts if you don’t use the default and have previously changed it. If you’re using Multisite, be sure to also run this query afterward if you need to update images there:
Replace the 2 in wp_2_posts to match the correct site ID as it corresponds to your subsites. You need to run this query for each of the sites in your network. This many not always be necessary, but if your network is set to use sub-directories and your sites aren’t mapped to use different domains, you may find you need to change your image links.
You also need to run the query below to update the GUID for images that are set as attachments:
Similar to the first example, you need to replace the domain with your actual URL and change the table prefix if you don’t use the default setting. You may also need to run this query for all the sites in your network:
Don’t forget to replace the 2 in wp_2_posts with the actual site ID number for the sites in your network.
Your images should all be updated to reflect your new URL using https. If it doesn’t work, sometimes trying again does the trick. It also helps to run each query one at a time, rather than attempting to run them all at once.
Search and Replace Image Links with Plugins
Using a plugin to search for and replace all the images on your site is a lot easier than doing this manually. It’s also a lot less likely that you would make a mistake that could ruin your site. Still, it’s important to double check everything you type in since you could still make a mistake.
These plugins are regularly updated so you don’t have to worry about being left behind with an outdated plugin. While not all of these plugins were intended for use on Multisite, they should still work when activated on a site-by-site basis. No matter which option you choose, they’re all quality plugins that should work well for your sites.
Better Search Replace is one of the plugins on this list that specifically has Multisite support. It has a simple design and not a lot of features or settings, but at the same time, it’s the only options most people ever need.
All you need is a running installation of WordPress and you can use this plugin which incidentally is as easy to install as it is to use. The best feature of this plugin is that you’re able to do a test run to see what tables are affected by the options you choose before you actually apply the changes. This means you’re less likely to make a mistake which makes it a valuable tool to have in your toolbox.
The Search and Replace plugin is able to handle a lot more than just replacing image links on your site. You can also use it to change your site’s URL and domain, backup and restore your database, and change your table prefixes from the default wp.
This plugin also has the ability to do a dry run to test out your proposed changes before pushing them through. It can be easier to avoid mistakes when you can see the results of your selections before having to worry about undoing your last changes.
Although, there is one requirement that this plugin needs to run which is a PHP version of 5.4 or newer. Search and Replace does install like most other plugins and there aren’t any extra steps involved. It also includes Multisite support.
WP Migrate DB is normally used for migration your site, but you can also use it to search for and replace old image links. It’s also great for migrating a locally developed site to a live setup.
It’s easy to install and doesn’t have any special requirements to run. While many wouldn’t necessarily think of this plugin initially when wanting to replace image links, it works great and it’s the first choice for this task for many WordPress users.
Wrapping Up
Images can be tricky business when switching your domain to include an SSL certificate. You can update your siteurl all you want, but those pesky images are still going to stay broken. The only solution to fix this issue is to update the image links yourself, although, it should be a breeze with the plugins in this post.
Have you been able to successfully change your image links? What plugin did you use or which one is your favorite? Do you have one you would rather use instead? Share your experience in the comments below.
At WP Engine, we’re customer inspired. Feedback from our customers directly influences what we do each day—from the features and updates we make to our platform to how we deliver WordPress expertise and technical support. We always strive to exceed our customers’ expectations.
Our technical support team is the heart and soul of the experiences our customers have with WP Engine. Our team of 150 passionate men and women work around the clock with the common goal of delighting our customers and ensuring their success. With over 40,000 customers across 138 countries, it’s a responsibility we take seriously.
Today, we’re thrilled to share that for the second consecutive year WP Engine has earned a Stevie Award, the world’s premier business award for customer service. This year, we took home a Silver Stevie Award in the Customer Service Department of the Year – Computer Software (100 or More Employees) category. Last year, WP Engine earned a Bronze Stevie Award in the Technology Contact Center of the Year (Up to 100 Seats) category.
This award is fuel for our team to continue to invest in new and innovative ways to serve and support our customers, and to continue to earn their trust and business. One way we do this is to provide help in the ways they most want to be supported, whether that’s through our Support Garage, Interactive Tutorials in our user portal, live chat, tickets or phone calls.
Offering these various channels for support has lead to some interesting discoveries.
For instance, we’ve learned that our customers prefer receiving support via live chat. Since we launched live chat support in 2013, it’s become our most popular channel—in 2015, we resolved more than 176,000 chats, compared to 133,000 tickets and 67,000 phone calls. And our live chat service consistently earns our highest satisfaction ratings. That’s why last year we extended our live chat hours to 6 a.m. to 8 p.m. Central, and plan to extend our live chat to full 24/7 coverage (just like we already do with tickets and phone calls) in 2016 to better serve our global customer base.
We also learned that some of our customers prefer to help themselves, which is why last year we launched our redesigned, data driven Support Garage, a one-stop shop for best practices, support articles, videos, and other content created by our team of WordPress experts and designed to answer most, if not all, of our customers’ WP Engine and WordPress support questions. We structured our Support Garage content by analyzing hundreds of thousands of support tickets to ensure we answer support requests right the first time, with content that is helpful and useful. We’ve also implemented an advanced analytics solution that helps us understand which support articles are best at answering our customers’ questions.
We’re incredibly proud to be recognized as a leader in delivering WordPress expertise and customer service. To have been considered for – and win! – this Stevie award is an honor that we owe to our customers. We’re grateful for the role we play in their lives, and we pledge to continue striving to exceed expectations and to continue finding innovative new ways to deliver on our support promise. Delighting customers is a 24/7/365 operation. We’re proud to be of service!
Tina Dobie is a results-driven software executive who is passionate about customer success. In her 20-plus-year career in the enterprise software, SaaS, and management consulting industries, Tina has built and led global teams to place the customer at the center of their business, while simultaneously optimizing internal operations for high growth and scalability.
Do you want to build a real estate website using WordPress? Are you looking for the best WordPress real estate themes? In this article, we will show you some of the best real estate themes for WordPress.
Each WordPress website has different needs. Unlike a normal blog or business website, a real estate website needs to display listings, have a slider, have a maps integration, have the ability to dynamically display content from IDX and more.
You want to have the ability easily add the listings, showcase the bedrooms and other features of the house, display all the important data in an organized format. The themes that we have chosen below are among the best real estate themes for WordPress.
White Real Estate WordPress Theme comes with powerful real estate portfolio post type. It allows you to easily add listings and show them prominently on your website. The theme also comes with a team management section, which can be used to showcase agents.
Apart from these specific real estate features, White Real Estate theme comes with all the standard features would expect from a premium theme. It has custom widgets and multiple sidebars, multiple page templates and layouts, shortcodes, Google fonts, an easy to use admin panel, etc.
Oikia real estate theme for WordPress comes with advanced map and location filter integrated with the listing you add to your site. It comes with built-in post types for properties and agents.
Executive is a clean and elegant WordPress business theme that can be easily used by any real estate agency. This fully responsive theme looks great with all devices and screen sizes.
It comes with built-in portfolio management system that can be used to showcase your listings and properties that you manage. It has multiple color schemes, page layouts, and it is very easy to setup.
Built on top of WPCasa framework, Elviria is an elegant real estate WordPress theme. It is designed with a mobile-first approach, which makes it fully responsive across all devices and screen sizes.
Elviria comes with built-in listings module and multiple ways to showcase those listings. It has listings widgets, listings slider, and listings carousel. There are multiple homepage layouts with unlimited color choices.
Smooth Pro WordPress real estate theme has built-in IDX-MLS search filter. It is fully responsive and easy to customize and setup.
The theme features a gallery slideshow of properties on the homepage. It has listings carousel gallery and agent/realtor profile sections. It has multiple color choices and custom widgets suitable for a real estate website.
WPCasa’s Bahia theme features large background image on the homepage with a very prominent search feature for listings. This fully responsive real estate theme comes with multiple homepage layouts and unlimited color choices.
It has listings carousel, custom widgets, and easy to use customization. The theme also comes with listing gallery which allows you to add listing images into a beautiful gallery.
Residence features Google Maps powered dislplay of listings on your real estate website. It also comes with IDX-MLS search filter, which makes it easier for users to find listings.
This fully responsive real estate theme comes with custom widgets, multiple page layouts, gallery carousel, and a currency and unit convertor.
Estate Engine is a powerful theme that can convert any website into its own real estate engine. You can monetize your real estate website by allowing users to add their own listings. You can add payment plans for listings and use multiple payment gateways supported by the theme.
It has a powerful listing search filter. It has integrated Google Maps support, galleries, sliders, and custom widgets. Estate Engine also comes with a mobile theme that your mobile users will see, it looks equally beautiful without compromising the functionality.
Main Street provides the a built-in search filter that supports IDX-MLS filters. It comes with Google maps support, featured property slideshow, galleries, and fast search feature.
Main Street also displays agents and realtors profiles beautifully on their own page. You can also display your listings and agents using the custom widgets shipped with the theme.
Elegant Estate is a powerful real estate WordPress theme by Elegant Themes. It comes with build-in section for listings, powerful listings filter, image gallery for each listing, and Google Maps support.
Apart from its powerful real estate website specific features, you will also get all the premium features you get with any theme from Elegant Themes. Like multiple page layouts, 5 color choices, shortcodes, an easy to use theme options panel, and rock solid code.
Modern Estate is a free WordPress real estate theme. It is fully responsive and looks beautiful on all devices. It keeps the real estate functionality out of the main theme and you will have to install a separate plugin for that.
upTown is a free WordPress theme designed by the folks behind the WPCasa framework for real estate websites. It also uses the same concept of keeping the functionality separate in a plugin, which you will need to install to transform the theme into a real estate website.
Built by StudioPress, AgentPress Pro is a fully responsive real estate theme for WordPress. The theme comes with a companion plugin called The AgentPress Listings plugin. It uses custom post types, custom taxonomies, and widgets to create a listings management system.
It has easy to use theme options panel, custom widgets, multiple widget ready areas, and customizable header. Built on top of the rock solid Genesis framework, AgentPress is secure, well maintained, and elegant.
Home Quest comes bundled with a wide range of features which make it a perfect real estate theme. There is a built-in listing management system that beautifully integrates itself into your website. It comes with a powerful listings search feature, which makes it super easy for users to browse listings.
The theme has 4 ready to use styles that you can switch with the click of a button. Apart from that it comes with all the usual features of a premium theme like homepage slider, featurede listings, custom widgets, multiple page layouts, shortcodes, etc.
Real Estate Agency is a WordPress theme for real estate agency. This theme does not focus on adding listings but more on the company and agency. It comes with a built-in portfolio section that you can use to showcase your listings or properties that you have managed.
It also comes with testimonials, services, and team sections. Real Estate Agency theme has custom widgets, shortcodes, sliders, accordions, and all the usual features you would expect from a premium theme.
Real Estate Theme is a free WordPress theme designed for agencies and individual realtors. It comes with built-in support for IDX search and filter with Google Maps support.
This fully responsive theme uses the customizer to set up your website with live preview. It comes with custom widgets, multiple page layouts, 30 Google fonts, property slider, etc.
The Vistas real estate theme comes with built-in MLS-IDX search integration right on the front page. It comes with custom widgets for a real estate website with multiple widgetized areas.
The theme comes in 5 color schemes and color and metrics selection. It can be used by both single agent and multi-agent agencies.
Must See comes with IDX support with easy search and listing filters. It is fully responsive, and comes with 4 predefined color styles. You can also choose your own colors if you need.
The theme comes with real estate specific custom widgets, listings post type, and taxonomies. Apart from that you will find the usual premium features like shortcodes, sliders, galleries, and agent profiles.
HomeQuest is a really powerful real estate directory theme. It can be easily monetized by allowing users and other busiinesses to add their own listings on your site.
It is fully responsive, and comes with multiple colors, custom widgets, and page layouts. It also features a dedicated mobile app view, when enabled this feature will make your site behave like a native app on mobiles.
Realtor is a premium theme for real estate professionals, agencies, portals, and real estate listing sites. It comes with property listings that can be displayed in grid or list view.
It also features an advanced property filter and search, properties map (built using Google maps API), agent profile page. It has various shortcodes, custom widgets, and all the options you would want to see in a premium theme.
Perfect Rent is a business theme for Real Estate and rental agencies. It comes with built-in post types for portfolio which can be used to show properties managed by an agent or agency.
It is a fully responsive WordPress theme and comes with built-in testimonials, services, and blog sections. Apart from that you will get the usual custom widgets, page layouts, multiple color choices, and WordPress multilingual support.
One of the many great features of WordPress is how easy it is to install. You can have a live site set up on your hosting platform before your coffee's done brewing.
It really is that quick when you factor in the famous five-minute install. But not only that, there are so many alternate ways to install WordPress that are just as quick. Some of the most popular methods use different software and platforms including cPanel, phpMyAdmin, FTP with FileZilla, SSH, and MySQL.
In this post, I'll show you how to install WordPress using all of these methods, including the famous five-minute install. I'll also go through how to setup WordPress with an auto-installer, such as Softaculous, which takes just seconds.
Roll up your sleeves, fire up your hosting account and let's get started.
What You Need
You should have a hosting account all set up, but you may not be ready to install WordPress just yet. Before you dive right in, there's some software you need to have already installed and some decisions you need to make as to the type of WordPress installation that will suit your needs.
You need to choose whether you want a single site or a network of sites, called Multisite. While the main installation process is the same, there are some additional steps required for Multisite. If you're not sure which option is right for your needs and need help deciding, check out The Ultimate Guide to WordPress Multisite.
One of the other decisions you need to make is what you want your site address to be for your visitors. You can choose to have your site accessible through your main domain such as www.your-site.com or through a sub-directory such as www.your-site.com/wordpress/. Where you install WordPress on your server will dictate the URL where your visitors can access your site.
If you want to install Multisite, it's recommended that your main site is accessible through your main domain since it won't work with a subdirectory, though sites in your network could be set up to a sub-directory or sub-domain such as site1.your-site.com.
No matter which type of install and URL you choose, you need to have certain combinations of software and platforms and many of the ones you need wholly depend on your preference. You do need to have your favorite browser installed, but here are the main combinations of other software and platforms you could use:
File Transfer Protocol (FTP) via FileZilla, a text editor and cPanel
Shell Access (SSH) to your server via PuTTY for Windows or Terminal for Mac OS X and MySQL
Most hosting companies have some of these platforms already installed for you on your server and can vary from host to host. If you use a VPS or dedicated server, you may need to install some of these yourself, though FileZilla and PuTTY are both desktop applications that are installed onto your operating system and not your server.
Once you have your desired programs all set up and have decided what kind of domain path you want, you're ready to Install WordPress through the famous five-minute install. You can scroll down through each section below to view the instructions for the specific software you chose.
1. Downloading and Extracting the Files
Exactly how you download and extract WordPress to your site depends on the method you choose. Let's step through what's available.
FTP and FileZilla
First thing's first: You need to download WordPress to your computer from WordPress.org. Extract the compressed folder and don't forget the path where it's located on your computer.
SSH and PuTTY or Terminal
If you prefer using SSH, you can download and extract the files right onto your server using the wget command. Keep in mind that when you extract the WordPress files via SSH, everything goes in a folder called wordpress so that means your site's URL would automatically be a sub-directory and written similarly to www.your-site.com/wordpress/.
If this is your goal, then go ahead and start by logging into your server in the command prompt. After logging in, you start at the root of your server by default, but most hosting accounts have a folder in the root where all publicly accessible files and folders are located. This is where you want the WordPress files to go so your site can be visited by everyone so you need to go to this folder.
To do this, you need to know the name of this folder and by typing ls into the command prompt, then pressing the enter key, you can view a list of the folders on your server. Once you have identified the public-facing folder where your site needs to be installed, you can enter the command below to access it. Just don't forget to replace public_html with the actual name of your folder if needed.
Next, type in the following command to download the latest version of WordPress into the folder you just selected:
You do need wget installed on your server for this to work, but most of the time, your hosting company installs it for you. If this command doesn't work, it may mean you don't have it installed. If you're not sure, open a support ticket with your hosting company and they can tell you what you need to know.
Finally, extract the files with this command:
Keep in mind that SSH commands may differ depending on the program you use so if you run into difficulties, consult your program's documentation for the correct commands.
2. Creating a New Database and User
Your website also needs a database to hold important information such as usernames, passwords, post and page content, and many other key bits of information.
When you're creating a new database and user, there are a few important things to keep in mind. While you can enter just about anything you want for your database or name, you should make sure any names you pick aren't easily guessable in order to prevent hackers from being able to easily guess your credentials and force their way into your database. This means you should try to stay away from obvious names such as wordpress or your domain name.
Many hosts also add a prefix to your database name and username automatically, usually ending with an underscore. It's used to distinguish your database from others on the server. You need to know both parts later on so make note of the names before continuing.
You also need to make note of your host name, which in most cases is localhost. Sometimes it's also followed by a colon and a few numbers. If you're not sure what your host name is, ask your hosting provider.
cPanel
Log into your cPanel home screen and click the MySQL Database Wizard button under Databases. This wizard guides you through creating a database one step at a time. You can also create and assign a user for your database here, which you need in order to complete the installation.
On the first page of the wizard, type in a name for your database, then click Next Step.
On the next page, there should be a message toward the top of the page letting you know your new database has been created successfully.
Create a new user with a strong password.
Now it's time to create a new user by entering your desired name and password. When you're done, click the Create User button.
Your new user needs to have full database privileges.
Once your user had been successfully created, you need to be grant full database privileges in order for WordPress to work. Click the All Privileges checkbox in the next step to automatically select all the available privilege levels then click the Next Step button at the bottom of the page.
You should see a "success" message on the next page to let you know everything went well. Now you're done and you can move on to the next step in the installation process.
phpMyAdmin
To create a database in phpMyAdmin, log in and click on the Databases tab to access the database creation form. If you only see a list of your current databases and no form, you can only create a database with an alternate method such as with cPanel.
Enter a name for your database in the first field. In the Collation drop down box, you will find a list of character sets. Click on it and scroll down to uft8 and see if you can find your language listed. If you find it, select that one. If you don't see it, choose the uft8_unicode_ci option.
You need to create a new database for WordPress.
Finish by clicking the Create button. You should see a message appear to let you know that your database has been successfully created.
Next, click the User accounts tab toward the top of the page and click the Add user account button. Enter a username and password and be sure the corresponding drop down boxes have Use text field selected for each then click Go at the bottom of the page.
Create a new user if you don't have one already that you want to use.
In the most recent versions of MySQL and since version 5.6.7, the host name option has been dropped altogether so it's actually meaningless now. In earlier versions, the any host selection meant that you're allowing your database to be potentially accessed from anywhere. If you chose any of the other options, you would be telling phpMyAdmin to only allow the database to be accessed from your computer or IP address. If you chose these options, it could be nearly impossible to access your database if you are traveling or using a different computer, for example.
Fortunately, it's no longer necessary so you can just leave it at its default setting and move on.
On the next page, you can select the privileges for the new user you created. Click the Check all checkbox next to the Global privileges label and then click Go at the bottom of the page.
You need to be sure global privileges are selected for your user.
You should see a message appear that lets you know your changes have been accepted. You can also conveniently note that your host name is listed at the top of the page, directly after Server:.
SSH and MySQL
If you still have an SSH session open in your command prompt, go ahead and type in the following command to access MySQL:
Be sure to replace "yourusername" with your actual username that you use to access your databases. When you are prompted, enter your password. If all goes well, you should see some introductory information about MySQL.
Next, enter the query below:
Don't forget to replace databasename with the actual name you want to use for your database. If you get an error message, you may not have access to this feature and in which case, you can try one of the other methods such as through cPanel or phpMyAdmin.
Once a message appears saying Query OK, you can enter the next command:
You should change databasename in this example to the name you chose in the previous query. You should also change newusername to the username you want to create and also update hostname to your actual host name.
When you have submitted that query, you can choose a password by entering the query below replacing password with the actual one you want to use.
When you see another Query OK message below your last query, you can go ahead and continue entering the next one:
Finally, enter the word exit and you're done. Your database and its user has been created and the user's global privileges have been set.
3. Edit the wp-config.php File
At this point in the process, you should have your files and database ready to go. There's still a crucial step you need to take. At the moment, your WordPress files and database aren't able to communicate with each other. If you tried to view your site now, your would only see an error.
To fix this, you need to add your database information to your wp-config.php file. If you try looking for it right now, though, you won't find it since it's named wp-config-sample.php and it's located directly in the forefront of the WordPress files and folders.
After you extract the compressed WordPress file, you should see a wp-includes, wp-content, wp-admin folders and many files. This is where the wp-config-sample.php file is held.
When you find this file and open it the section you need to edit is toward the top and looks exactly like this:
Before you go rogue and start editing with your preferred method, it's important to understand what needs editing and why. When you have a good handle on this, making the changes is not only quicker, but you're less likely to make a mistake that results in errors later on so let's take a look at the edits you are going to be making.
The first change you need to make is to include your database name, which you created earlier. The specific section you need to focus on is this one:
Replace database_name_here with the actual name of your database. Be sure to keep the quotation marks and other characters intact throughout this editing process.
On the next couple of lines, you need to replace username_here with your database's username that you created earlier. The line you need to edit looks exactly like this:
Once you're done here, move on to the next couple of lines to enter your database password. This is the exact line you need to edit to include your password:
Replace password_here with your actual database password. This is the one you created at the same time as your database user.
Next, check to see is your host name is correct. This is the line you need to locate:
By default, it's set to localhost and in most cases, you don't need to change this, but in some cases, it may be necessary. If you haven't been able to locate this information yet, check with your hosting provider since they can give you this information.
The final stretch of edits you need to make in this file have to do with authentication keys and salts. It's the section that repeats put your unique phrase here toward the end. This is a security feature that helps keep your WordPress site safe from hackers.
To get your own set of fresh and unique authentication keys and salts, go to the WordPress online key generator to randomly generate keys for you. When you visit the generator, you should see a stretch of code that looks similar to this:
The generated code provides you with secure keys and salts that you can use. It's important to never use the same generated code for more than one of your sites. Otherwise, this security feature won't be secure anymore.
You also shouldn't share this information with anyone and you definitely shouldn't use the example above since it's publicly available for everyone to see. If you do use it, it would be that much easier for hackers to exploit your site since that's one less thing they would need to figure out.
That's the last of the edits you need to make in this file. You can save your changes from here. The final step you need to take here is to rename the file to wp-config.php. Of course, how you do this depends on what editor you use so you can scroll down below this section to find out how you can make these edits with different programs and platforms.
It's worth mentioning that, technically, this step is optional. Later on, when you run the install script, it can try and complete this step for you so you don't have to worry about digging into code.
Just keep in mind that you still need to know the database name, username, password and host name. While it works most of the time, there's still a chance it may not. The only way to truly be sure your files and database connect correctly is to complete this step yourself.
So here's the part where you choose your own adventure. You can either skip this step and move on to the next one or if you're keen on giving it a try, let's take a look at how you would edit this file with SSH and if you prefer FTP.
A Text Editor and cPanel for FTP
If you prefer to use FTP over SSH to handle file transfers, then you can either open the wp-config-sample.php file in your preferred text editor or you can also edit the file directly in cPanel.
I prefer to use Adobe Brackets much of the time because it works really well for editing code, it's open source and it's free. With Brackets, you can visually differentiate between different parts of the code since it's color-coded whereas cPanel doesn't have this feature. Brackets also has many other features that help you edit code faster and easier.
Adobe brackets has a nicer editing experience than cPanel.
Of course, there's no one-size fits all for editing code so choose the editor you like the best and go ahead and make the edits you need. If you prefer a text editor, open the wp-config-sample.php file and when you finish applying the edits that are needed, save it as wp-config.php in the same location as the original file.
If you prefer cPanel, log in and click Files > File Manager. Navigate to the wp-config-sample.php file, click on it once and then click Edit at the top of the page. When you're finished making the necessary edits, click Save Changes at the top, right corner.
Select the file again if it's not already highlighted and click Rename at the top of the page. Edit the field in the inline pop-up to read wp-config.php, then click Rename File to apply your changes.
SSH and PuTTY or Terminal
Start by logging into your server if you haven't done that yet. To view and edit the contents of wp-config-sample.php, first navigate to its location within your server just as you did in the first step with the cd command.
Next, select the file for viewing and editing with the following command:
Press the arrow keys on your keyboard to navigate through the document to edit the necessary portions. When you're done, click the "Esc" button, then enter :wq anywhere in the file to save your changes and exit.
If pressing the escape button doesn't do anything, just skip to saving and exiting the file. Not every SSH program is exactly the same so you may need to look up the commands as they correspond to the program you're using if you're not sure.
4. Uploading Files
Sure, you have your files on your computer, but if they're not on your server then they won't do you much good. Let's remedy that, shall we?
FTP and FileZilla
Uploading your files with FileZilla is as easy as dragging and dropping, literally. If you're not familiar enough with FTP or FileZilla yet or need a refresher, take a look at our comprehensive guide called How to Use FTP Properly with WordPress.
SSH and PuTTY or Terminal
Guess what? If you have been using SSH up until this point all your files have been already uploaded and you can skip over to the next step.
5. Running the Install Script
At this point, you're on the home stretch of installing WordPress. To finish up the process, open your preferred browser and navigate to the install script. To access it, type in the path to your site then follow it with /wp-admin/install.php.
Depending on the path of your WordPress installation, the URL may differ in your specific situation. Here are some possibilities depending on where your WordPress files are located:
Root of your server - www.your-site.com/wp-admin/install.php
In the /wordpress/ folder - www.your-site.com/wordpress/wp-admin/install.php
In a different sub-directory - www.your-site.com/sub-directory/wp-admin/install.php
Select the language the WordPress admin dashboard should be in.
Once you're there, you first need to select your language, then click the Continue button.
You can change the language WordPress is in later under Settings > General so you don't have to worry too much about it now. This also doesn't affect the language your site is written in on the front end.
If you didn't edit your wp-config-sample.php file earlier you should be prompted with a message next to let you know that you need to enter your database details. Click the Let's Go button to continue to the next page.
The following page is where you can enter the necessary details to connect your WordPress files to your database.
Enter your database details if you didn't edit them before.
It's recommended that you change the table prefix to something less well-known if you feel comfortable with it. This is so it's less guessable for hackers. Since most users have their table prefixes set to the default wp_, it's one less detail hackers need to figure out to try and force their way into your site and server.
The downside is there may be plugins and other scripts that won't work because they are programmed to access your database and assume you are going to have your table prefixes set to its default. It's important that you make this decision carefully since it could impact your site in the future.
When you're done entering in all your details, click the Submit button at the bottom of the page to continue.
If you are met with an error message letting you know that the attempt to establish a connection between your files and database has failed, click the Try Again button to re-enter your database details.
If you enter in your database details incorrectly, it results in an error.
If your database name and username contains a prefix, don't forget to enter it in with the name you typed in when you created your database. That's usually the most common mistake. If you know this information and your password is correct, make sure you have the right host name. You may need to contact your hosting provider or server admin if you don't have this information.
When you receive a message letting you know the connection was successfully established, click on the Run the install button to continue.
If you went ahead and edited your wp-config-sample.php file already, you should automatically be sent to this next page to start installing WordPress.
Enter your basic site details and you're ready go.
Enter basic details such as your site's name, the username and password you want to use to log into your admin dashboard and your email address. If you want your site to be indexed by search engines (read: Google) then leave the Search Engine Visibility checkbox unchecked.
A strong password is already generated for you, but you can enter your own in if you would prefer that.
When you're done typing everything in, click the Install WordPress button at the bottom of the page. When you receive a message letting you know the install was a success, click the Log in button to be directed to the login page.
Enter in the username and password you just chose in the last step and click Log in. You're now directed to your admin dashboard, you're done installing WordPress and you're ready to start fully customizing your site.
Auto-Installing WordPress
If the famous five-minute install isn't fast enough for you, you can use an auto-installer and have your new WordPress site up and running in about one minute. In fact, the part that takes the longest is entering a few details such as your site's name, and the username and password you want to use.
One of the most popular auto-installers is called Softaculous. Some hosting companies give you this option by default when you sign up while it may be an extra cost or not at all available with others. Some hosting providers provide their own auto-installer.
Some hosting providers provide their own auto-installer. If this is the case with your hosting plan, consult your hosting company's documentation or contact them if you're not sure how to use this feature.
Most auto-installers are fairly similar to Softaculous so you can generally learn how to use them all when you know how this one works.
If you have cPanel installed on your server as well, you can access the auto-installer by clicking the Softaculous Apps Installer button on your account home page.
WordPress should be listed right on the homepage. Click it to access its auto-installing process.
The WordPress auto-installer is easily accessed through the Softaculous main page.
Click the Install tab to start the installation process. Fill out the information and when you're done, click Install at the bottom of the page.
The WordPress auto-installer form is straight forward.
While the auto-installer is mostly straightforward to complete, some of the fields may be trickier than others if you're not too familiar with WordPress.
Here's an explanation of all the options:
Choose Protocol - If you have an SSL certificate installed, you can choose to automatically apply it to your site. You can also set whether you want www. to used by default for your URL
Choose Domain - You can choose from the domains you have already added to your account
In Directory - You can choose to locate your site in a sub-directory by typing something into this field or leaving it at its default setting
Site Name - This is the name of your site or blog
Site Description - This is your site's tagline
Enable Multisite (WPMU) - You check click this checkbox to automatically install Multisite
Admin Username - This is your desired WordPress username to access the admin dashboard
Admin Password - Your desired password for your WordPress admin account
Admin Email - The email where your site's administrative email notifications are sent
Select Language - The language your admin dashboard should be in
Limit Login Attempts (Loginizer) - If checked, this option installs the Loginizer plugin to limit how many times a visitor can unsuccessfully try to log in to help prevent your site from getting hacked
Database Name - If you want to specifically name your database, you can do so in this field or leave it up to Softaculous to create a random database name for you which is the default
Table Prefix - If you want to change the prefixes of your database tables, you can change it in this field
Disable Update Notifications - If checked, you won't receive an email when there are updates available
Auto Upgrade - When checked, Softaculous can automatically attempt to update WordPress when they become available
Auto Upgrade WordPress Plugins - Softaculous can also attempt to update plugins if you check the box
Auto Upgrade WordPress Themes - Similar to the previous option, you can also authorize Softaculous to attempt to update your themes automatically
Automated backups - This drop down box contains the option to disable automatic backups of your installation or to choose how often backups should be made
Backup Rotation - If the last option is enabled, this drop down box becomes accessible and you can choose how many backups for Softaculous to save at one time. Older backups are deleted when new ones roll in or you can choose to keep them all
Select Theme - There are many free themes available in a carousel that you can choose to install. You can choose multiple themes if you want
Email installation details to - You can enter an email here if you want the details of your installation and site to be sent to you including your username, password, URL and admin URL
Softaculous is almost done installing WordPress.
When the installation starts, you are directed to a page with a progress bar. When the installation is complete, you're redirected to a page with your site's address and admin login page. At this point, your site was successfully installed and you can visit it right away.
When the installation is complete, you're redirected to a page with your site's address and admin login page. At this point, your site was successfully installed and you can visit it right away.
Depending on your internet connection, the auto-installer can take a few seconds or three to four minutes on slower internet connections so don't panic if it seems to take quite a while. It also depends on the resources your server has available to run scripts such as Softaculous.
Wrapping Up - and Dealing with Errors
By now you have successfully installed WordPress and you're ready to write posts or customize your theme. What seemed like a daunting task actually ended up being quite quick. That doesn't mean you can necessarily get away with not receiving any errors at all.
If you do receive errors, make sure you didn't mistype anything when entering your database details and also make sure they're entered in correctly into your wp-config.php file. You can also create new passwords and re-enter them in if everything seems right, but still doesn't work. You can also try generating new authentication keys and salts and replacing the old ones in your wp-config.php file.
In the event that none of these suggestions fix the issue, make sure you're also running the latest versions of the software you're using. If all else fails, try deleting everything you created and start again. When in doubt, you can also get in touch with the WordPress community in the support forums or also try contacting your host. It's also worth a try to check out the WordPress Codex's Installation Guide as well.
What's your favorite method of installing WordPress? Do you find the famous five-minute install fast and easy? Would you change anything or add certain capabilities? Share your thoughts in the comments below.